
Tutorial written by Joanne Salgado on February 18th, 2015
Any resemblance to any other tutorial is coincidental.
Do not copy and paste this tutorial anywhere on the net.
If you want to translate please ask first.
Tube: Alicia Mujica at CDO - you can purchase here
Material by me here
Font: AR CARTER
Don't forget to save often.
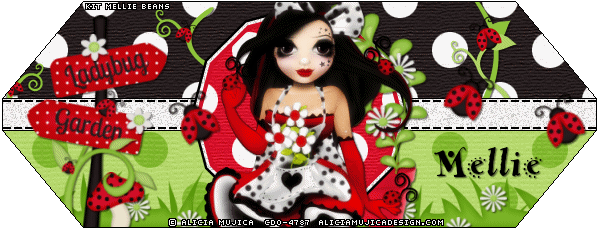
1. Open the template provided. Duplicate, close the original. Delete the info layer.
2. Open paper 4, change the foreground to pattern. Look for the paper, select "up back" layer, with your flood fill tool (change the match mode to RGB Value) and colorize with the pattern.
3. Open paper 7, look for the paper on your patterns. Select "bottom back" layer and colorize with the pattern.
4. Open element 6, copy and paste as new layer, arrange it to the bottom of the template. (don't worry about cleaning out the frame now).
5. Open element 13. Copy and paste as new layer. Resize with 5% and arrange it as you like around the grass, duplicate and arrange again. Do as many as you like. I have a total of five.
6. Open element 8. Copy and paste as new layer. I've arrange the top on the left of the center (looking as its growing from there). Duplicate and the middle part of the element to the right and the again the top on the far left of the template. (see my tag).
7. Open element 15. Copy and paste as new layer. Resize with 10% and arrange it to the bottom right with a part showing and the other covered by the center.
8. Open element 7. Copy and paste as new layer. Resize with 25% and arrange it to the left. Move this layer above the "line" layer.
9. Open element 4. Copy and paste as new layer. Resize with 8% and arrange it to the left with a small part above the sign.
10. Open element 17. Copy and paste as new layer. Resize with 15% and arrange it to the left (see my tag). Once your happy with the place, with the eraser tool clean the leaf that's above the word "garden". The other one I left it there.
11. Open element 19. Copy and paste as new layer. Resize with 4% and arrange it to the top of the sign. Duplicate and arrange it to the corner of the bottom sign (see my tag).
12. Open paper 6, go to patterns and look for the paper. Select "white back" layer and with the flood fill tool colorize it.
13. Change your pattern to color again, with the dropper tool pick the red from the paper or from the sign (I used #cf0924). Select the layer "grey frame" and with flood fill tool colorize it.
14. Open element 16. Copy and paste as new layer. Move this layer above the "black frame" layer. Resize with 20% , image/mirror. Arrange it to the corner of the center frame. Duplicate, resize 80% and arrange a little below the one before. (see my tag). The lower part of this one should look like its getting out of the bucket. Clean the extra parts.
15. Open element 13 again. Copy and paste as new layer. Resize with 7% and arrange it above the leafs. Duplicate and move a little below the other.
16. Open your tube. Copy and paste as new layer. Resize it as you like and arrange it to the center of the template.
17. Open element 9. Copy and paste as new layer. Resize with 6% , image/rotate/free rotate 45 left. Arrange it to the far right of the template. Duplicate two times, the first one image/mirror. Arrange it to the right, up the middle line. The second duplicated arrange it to the left above the lines from the center frame.
18. Now we will clean all that got out of the frame. Select the "frame" layer. With the magic wand tool select out of the frame. Select each layer from up to bottom and each time hit delete on your keyboard.
Add your copyright and name.
For Animation.
1. Select the "center white" layer and duplicate it 2 times (you should have a total of 3). On the first go to adjust/add-remove noise/add noise 50 uniform and monochrome checked. Hide the layer. Go to the second, same as before and hide the layer. Go to the third and same as before. Leave this one open.
2. Select the "white frame" layer and duplicate it 2 times (you should have a total of 3). On the first go to adjust/add-remove noise/add noise 50 uniform and monochrome checked. Hide the layer. Go to the second, same as before and hide the layer. Go to the third and same as before. Leave this one open.
3. Edit/Copy Merged. Go to Animation Shop and paste it as new animation.
4. Back to PSP hide both layers and open the next ones. Edit/Copy Merged. Go to Animation Shop and paste after current.
5. Back to PSP hide the layers and open the last ones. Edit/Copy Merged. Go to Animation Shop and paste after current.
Save as gif