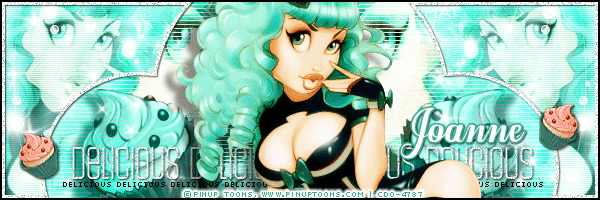
Tutorial written by Joanne Salgado
for those who have a working knowledge of PSP.
Any resemblance to any other tutorial is coincidental.
Do not copy and paste this tutorial anywhere on the net.
If you want to translate please ask first.
MATERIALS:
Tube: Used Enamorte - You can purchase her tubes at CDO
Template: download HERE
Plugins: AP [Lines] - SilverLining
Filter Factory Gallery B-Sliding Spirals
Fonts used: Weltron | Pixelate | Brush Script MT
~ DON'T FORGET TO SAVE OFTEN ~
Open the template
duplicate it, close the original
delete the layer "info"
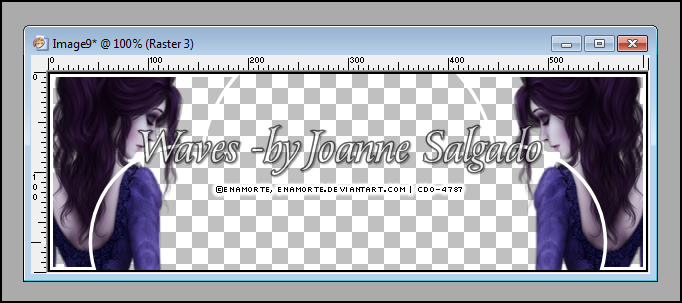
open your chosen tube, paste it as new layer.
Drag the tube layer under the "white border" layer.
Arrange the tube to the left, duplicate and mirror.
It will look like this:
with your duplicate layer selected, right click above it, merge down.
open your chosen texture, color it if needed to suit your tube
copy, paste it as new layer (you will need again later)
drag the layer below the tube (it should be the last layer)
select your tube layer, duplicate it
on the duplicated one, change the blend mode to screen
on the original, change the blend mode to soft light
(you may want to play around with the blend mode to suit your tube and colors)
close the layers "black border" and "white border"
merge visible, duplicate the merged layer
and change the blend mode to soft light
leave it for now,
get your texture again and paste it as new layer
click on the layer "white border"
using the magic wand select the middle of the white border layer
selections - modify - expand 1
selections - invert
go back to the texture effect you just added and
hit delete on your keypad or edit - cut
selections - select none
arrange the texture layer below the white border
open you tube and arrange as you like inside the middle of the white border.
I have arranged like this:
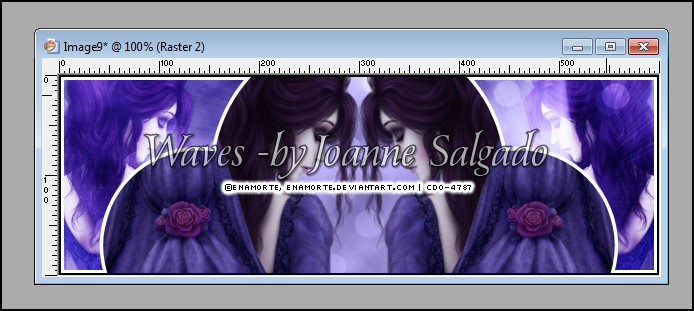
close your other layers living just your arranged tubes and merge them together.
Open the template
duplicate it, close the original
delete the layer "info"
open your chosen tube, paste it as new layer.
Drag the tube layer under the "white border" layer.
Arrange the tube to the left, duplicate and mirror.
It will look like this:
with your duplicate layer selected, right click above it, merge down.
open your chosen texture, color it if needed to suit your tube
copy, paste it as new layer (you will need again later)
drag the layer below the tube (it should be the last layer)
select your tube layer, duplicate it
on the duplicated one, change the blend mode to screen
on the original, change the blend mode to soft light
(you may want to play around with the blend mode to suit your tube and colors)
close the layers "black border" and "white border"
merge visible, duplicate the merged layer
and change the blend mode to soft light
leave it for now,
get your texture again and paste it as new layer
click on the layer "white border"
using the magic wand select the middle of the white border layer
selections - modify - expand 1
selections - invert
go back to the texture effect you just added and
hit delete on your keypad or edit - cut
selections - select none
arrange the texture layer below the white border
open you tube and arrange as you like inside the middle of the white border.
I have arranged like this:
close your other layers living just your arranged tubes and merge them together.
Your layers should look like this:

1. black border
2. white border
3. your merged tubes
4. inside texture
5. copy of your background merged
6. original background
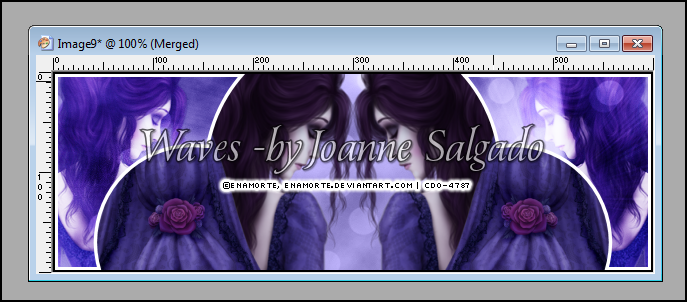
select the white border layer, with your magic wand select inside of it
selections - modify - expand 1
selections - invert
select your merged tubes layer and hit delete or edit - cut
your work should be looking like this:
with your arranged tubes layer select, duplicate it
on the duplicated layer: effects - plugins - AP [Lines] - SilverLining
with this settings:
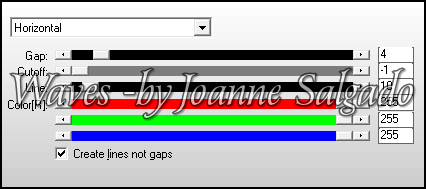
change the layer opacity to 40
with your text tool write your text with white or one that suits your tube and colors
I've used the font Weltron size 36
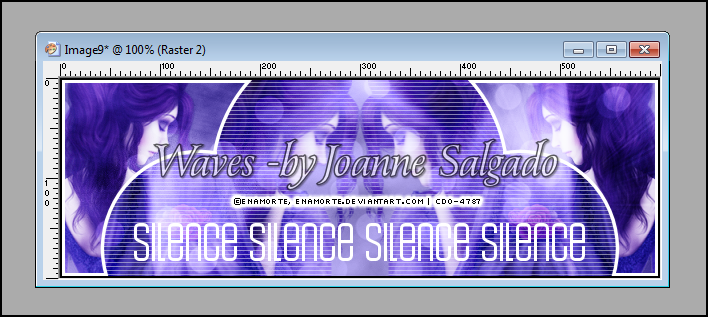
should look like this:
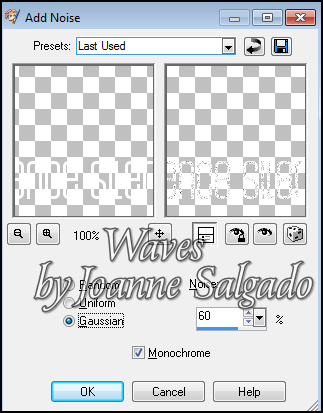
layers - convert to raster layer
adjust - add/remove noise - with this settings:
add a soft shadow - used 1-1-65-2-black
with smaller font write the same text again
I've used the font pixelate size 6 anti-alias off
layers - convert to raster layer
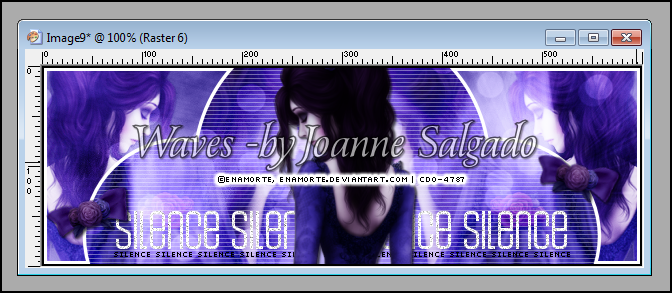
should look like this:

select the white border layer
open your tube, copy - paste it as new layer
the tube has to be above the white border layer
arrange the tube in the middle of your tag
copy - change the blend mode to soft light
adjust - blur - gaussian blur 3
click on the original layer of the tube
add a suitable drop shadow
I've used the flowers from her dress on both sides of the white border as you can see.
Choose something that suits your tube and colors as embellishments.
Should look like this
Add your copyright
Now let's animate!
Select the duplicated background (should be the second layer from bottom up)
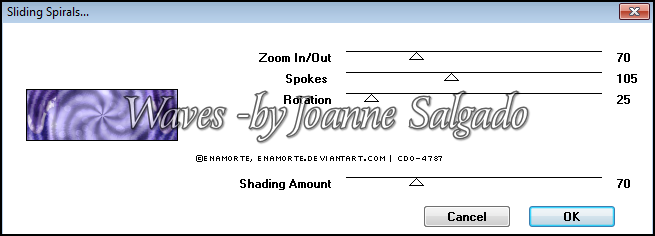
Effects-Plugins-Filter Factory Gallery B-Sliding Spirals
with this settings:
(depending of the color of you tag you may want to modify Shading Amount)
select the white border, add/remove noise, same settings as before.
add drop shadow, 1/1/65/2 black
edit - copy merged
go to animation shop, paste as new animation
go back to paint shop pro, undo drop shadow, noise and filter
now go again to Effects-Plugins-Filter Factory Gallery B-Sliding Spirals
change the rotation to 45
select the white border, add/remove noise, same settings as before.
add drop shadow, 1/1/65/2 black
edit - copy merged
go to animation shop, paste after current
go back to paint shop pro, undo.
do the same changing the rotation to each time with the settings:
25 - 45 - 65 - 85 - 105 - 125 - 145 - 165 - 185 - 205 - 225 - 245 - 255
in the end you should have 13 layers on animation shop.
add your name and save it as .gif
Other Exemple: