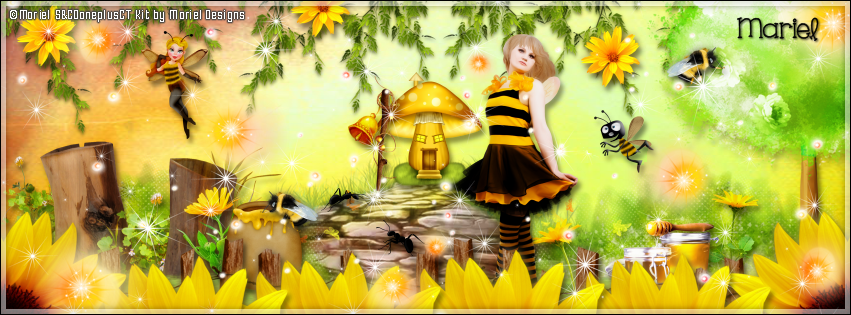
BUZZING TUTORIAL
**Click to see original size**
Tutorial written by Marcia Salgado on May 29th, 2016
for those who have a working knowledge of PSP.
I'm using PSP9 to create my tuts.
Any resemblance to any other tutorial is coincidental.
Do not copy and paste this tutorial anywhere on the net.
If you want to translate please ask first.
****************************************
Material:
Tube: "Bee Spring" by Mariel, you can purchase it here
do not use without the proper #license.
PTU Kit "Bee Spring" by Mariel Designs, you can purchase it here
Font: KG One Thing
****************************************
--> Remember to save often and use my tag as reference if necessary. Use a Drop Shadow of your preference on layers.
1. Open a new image 851x315
2. Open paper 'PAPER 7' copy and paste as new layer. Use Raster Deform Tool and stretch the paper so it fills the canvas.
3. Open element '33' copy and paste as new layer. Arrange it to bottom.
4. Open element '81' copy and paste as new layer. Resize 20%. Arrange it at the end of the stone path.
5. Open element '97' copy and paste as new layer. Arrange it to the bottom right. Duplicate. Mirror.
6. Open element '14' copy and paste as new layer. Resize 50%. Arrange it to the bottom left.
7. Open element '109' copy and paste as new layer. Arrange it to the bottom right. Duplicate. Mirror.
8. Open element '48' copy and paste as new layer. Resize 15%. Arrange it to the bottom left.
9. Open element '27' copy and paste as new layer. Resize 15%. Arrange it to the bottom right.
10. Open element '26' copy and paste as new layer. Resize 15%. Arrange it to the left of the one we just added.
11. Open element '105' copy and paste as new layer. Resize 15%. Arrange it to the bottom left.
12. Open element '5' copy and paste as new layer. Resize 20%. Arrange it to the bottom right.
13. Open element '84' copy and paste as new layer. Arrange it to the top right. Duplicate. Mirror.
14. Open your tube. Copy and paste as new layer. Resize as needed and arrange it a little to the right.
15. Open element '119' copy and paste as new layer. Arrange it to the right.
16. Open element '111' copy and paste as new layer. Arrange it to the bottom right. Duplicate. Mirror.
17. Open element '116' copy and paste as new layer. Resize 10%. Arrange it to bottom.
18. Open element '117' copy and paste as new layer. Resize 10%. Arrange it to bottom.
19. Open element '28' copy and paste as new layer. Resize 10%. Arrange it to the top. Duplicate and arrange it around. Do as many as you want. I only used three.
20. Open element '31' copy and paste as new layer. Resize 20%. Arrange it to the top left.
21. Open element '32' copy and paste as new layer. Resize 12%. Arrange it to the right.
22. Open element '62' copy and paste as new layer. Resize 20%. Arrange it to the left of the mushroom.
23. Open element '113' copy and paste as new layer. Resize 10%. Arrange it above the honey pot. Duplicate. Mirror. Arrange it at the tree.
24. Open element '58' copy and paste as new layer. Resize 50%. Arrange it to the bottom right. Duplicate. Mirror. Duplicate. Arrange it to bottom. Duplicate and arrange it until you fill up all bottom part.
25. Open element '98' copy and paste as new layer. Arrange it to the left. Duplicate. Mirror/Flip.
26. Open element '79' copy and paste as new layer. Arrange it to the left. Duplicate. Mirror/Flip.
27. Add a new layer. Select all. Fill with white. Contract 6. Hit delete on your keyboard. Select none. Change opacity to 50.
28. Add a new layer. Select all. Fill with black. Contract 1. Hit delete on your keyboard. Select none.
--> Add your copyright info and license#. Add your name or initials. Save as PNG.
--> Sometimes I had to change my Timeline size to 846x313 because when I add it to Facebook the image has extra pixels and do not fit perfectly. So try this size if the same is happening to you.
--------------------------------------------------------------------
My idea for the FB Profile Picture


